Nothing guitar-related, the statistics just tell me that there's been the total of 10 000 visits in this blog. Not even half of that is my own traffic ; )
Feel free to drop a note when visiting! I've understood that some of you come quite frequently.
keskiviikko 25. huhtikuuta 2012
lauantai 21. huhtikuuta 2012
Bye bye blackbird
Project number six is now finished and delivered. This was so far the hardest for me to part with. On the other hand, I feel relieved to have finally closed the case. No more guitar building for a while. Say, not before monday at least.


keskiviikko 18. huhtikuuta 2012
Nearly finished
The bridge seems to have glued pretty well. So the strings are attached, and the random pieces of fancy wood turned into a nice playing instrument with amazing sustain. Here is a little sound sample, not well played (or sung), but hopefully a bit informative. Hadn't I done this for Jyrki, it'd be a keeper for sure.
Here I found a handy string spacing calculator for the nut slots. These are indispensable in giving the bone pieces the shine it deserves. I strongly suggest getting a bone nut, saddle and bridge pins for any acoustic guitar. The difference is so clearly audible, I'll never go back to any plastic anymore.. Nice and inexpensive bridge pins can be found here.
Here I found a handy string spacing calculator for the nut slots. These are indispensable in giving the bone pieces the shine it deserves. I strongly suggest getting a bone nut, saddle and bridge pins for any acoustic guitar. The difference is so clearly audible, I'll never go back to any plastic anymore.. Nice and inexpensive bridge pins can be found here.
 |
| Simple livingroom setup. You can even hear the clock on the mp3 |
 |
| The treble side string ramp needs to be deepened a bit. Now the high e-string is in contact with it. |
 |
| I was bold and brave enough to sign the inside label |
 |
| Here you can see the ramp underneath the fingerboard. Instead of gluing the fb straight to the top, I put a redwood wedge in between. This allowed me to get the saddle height I wanted, and took completely away all the issues with the fingerboard extension warping and causing buzzes in the high fret positions. This way the top can have its arch and be still playable. Recommended! |
 |
| The old timey tuning machines (Golden Age tuners from stewmac) suite this kind of a slot head nicely |
 |
| The armrest is in contact with the 7mm of the top edge only. This helps protect the top from sleeve buttons etc , and takes the players muting arm off the top. There's a clear pickguard at the treble side, made of double layered self-adhesive plastic film sold for protecting books. Good for protecting spruce tops also! |
 |
| The guitar is fitted with JJB Prestige contact pickup. I like the end wedge really nice. |
maanantai 16. huhtikuuta 2012
Gluing down the bridge, bolting the fingerboard
The last glue seam has been done for Jyrki's guitar. Here's a few pictures and some explanations to show how I did it this time.
My big weakness in luthiery has been the bridge. Every bridge I've glued has had to be re-glued at some point after the first assembly. Now I believe I got it right from the start. Time will show.
I've used bolt on attachment of the neck in every guitar. Two threaded inserts are inserted in to to heel of the neck, and the neck is bolted on to the body (the heel block) with 6mm furniture brass bolts. This time I decided to use tiny threaded inserts and 3mm bolts to attach the fingerboard extension as well. This way the neck will be fully removable, should there ever be a need for that.
Here we go
 |
| The underside of the fingerboard received a pair of threaded inserts, with wood screw in the outside and 3mm thread in the inside. |
 |
| I reinforced the inside of the fingerboard attachment area with a 4mm birch plywood. The holes are not nearly perfectly alingned, but symmetry isn't crucial here. Everything will be hidden. |
 |
| The outline of the bridge scribed on the shellac at exactly the place. |
 |
| I used low-tac tape at the bottom (not to tear out splinters of top once the tape is removed), and on top of it double sided tape to attach the 100grit sandpaper to follow the profile of the top. The bottom of the bridge is marked with a crayon to show how fitting is advancing. |
 |
| Using very small movements, the bridge is sanded to fit the curvature of the top |
 |
| This little stick gives the bridge area just a little lift - just like the strings will. It also prevents the top from giving in under my sanding strokes. |
 |
| Getting there |
 |
| Now the whole bottom is covered with sanding scratches and the crayon is gone. Time to make a dry fir |
 |
| With the bridge clamped, I'm testing the fit with a 0,05mm feeler gauge. If the 1/20th of a millimeter won't fit in between anywhere, it's close enough for me. |
 |
| Time to cover up and scrape off the shellac. A razor blade will do the stripping, with the help of a small 220 grit sanding block. The bridge is always glued wood to wood. |
 |
| This is for real! The excess glue is coming out all over, with means a good fit. Here the glue is already wiped of with a damp rag. |
 |
| At least it seems to fit! |
 |
| Here's a photo of my improvised bridge slotting jig. Just a little pocket to keep the chunk of wood in place, and a steel ruler to steer the cut. |
torstai 12. huhtikuuta 2012
Headstock decal
I'm awfully busy with my real work, but nevertheless wanted to post a few pictures of the headstock decal that arrived today from Best Decals. They have a handy decal-designer app at their site. The logo says Kenosis, which is greek (κένωσις) transcribed into latin alphabet and means emptying. It's the word st. Paul uses in Philippians 2:7, describing Christ's incarnation, his coming down and self-humbling. He was nothing short of God, but emptied Himself of his divine glory and power, was born of Virgin Mary and became our servant and slave to save us.
In addition to these spiritual connotations, kenosis to me marks the process of building the guitar and letting go of it "into the wold." During building, the luthier "empties" everything he/she knows about the craft – and a lot of what he/she is, his soul – into the single instrument. When finished, it's time to let the guitar go and start making music in somebody else's hands. But because of this "kenosis", in every note played and every moment spent with the instrument, the builder is somehow present.
New ageish? Maybe, but not intentionally. Sugary sweet? Heck sure!


keskiviikko 11. huhtikuuta 2012
Case fitting & armrest
At this stage of finishing, I just can't help fitting the almost done (but oh, so many days to go) guitar in it's case to come. Maybe it's the odd pieces of wood coming together as one, meaningful (and substantially bigger) piece of wood. Maybe it's just looking at the beauty of a traditional shape, reproduced and interpreted once again. One of the reasons I so much love this craft is looking at the guitar. Of course it's about sound and music, but also looking at and holding the instrument. Even smelling it (therefore, I prefer spanish cedar for kerfings). Savouring it with all the senses... When was the last time You picked up a fine instrument and savoured its fine details and aspects?
[Note to self: Never leave the almost-finished-guitar-to-be-savoured on the floor in an open case. A three year old might pick up the not yet glued bridge and drop (ok, throw) it on the not yet hardened top finish, giving daddy a few extra rounds of finishing...]
[Note to self: Never leave the almost-finished-guitar-to-be-savoured on the floor in an open case. A three year old might pick up the not yet glued bridge and drop (ok, throw) it on the not yet hardened top finish, giving daddy a few extra rounds of finishing...]
 |
| Alreadty starting to look guitarish... |
 |
| The saddle slot is cut (maybe a picture of the fixture later). The armrest is made of rosewood and redwood. We'll see if it will find it's way to the final product. |
 |
| The logo in the case says "Thomann". Otherwise the case is sturdy and ok. A headstock logo with word "kenosis" is on it's way to Finland. More of that it if fits... |
maanantai 9. huhtikuuta 2012
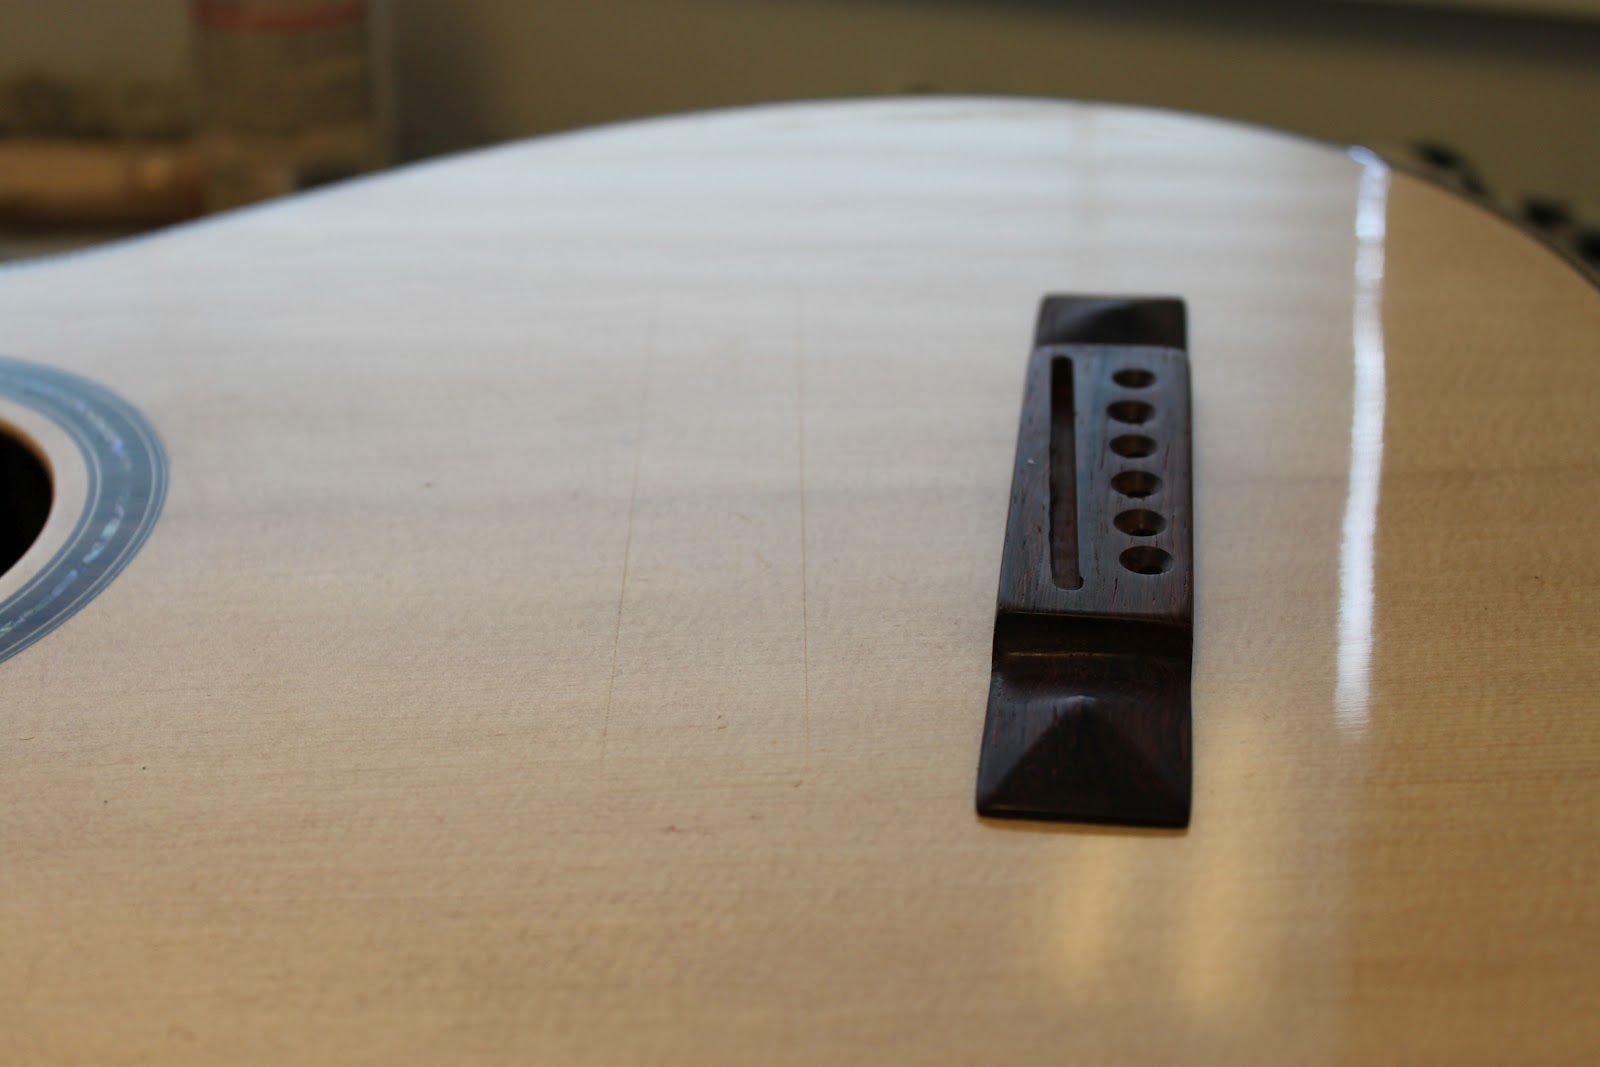
Pyramid bridge
I decided to try if I could make a traditional pyramid bridge. Some carving, filing and sanding later it turned out I could. The bridge saddle slot needs to be routed, some sanding and polishing to be done and the pin holes drilled, but the basic shape is there. It's made of Madagascar rosewood, If i recall my stock right.


 |
| Starting to introduce the shine. Took many hours of additional pumicing even thou I thought I had filled the pores already... |
keskiviikko 4. huhtikuuta 2012
Beginning the finishing
Here's a few shots of the beginning of the finishing of Jyrki's guitar. I love the point when the fine sanded woods start to come alive and get their finished colours under the first shellac coats. This is the point when faith is starting to turn into seeing...
Tung oil and french polishing are the ways to go in this shop. No spray guns allowed. Or needed.
Tung oil and french polishing are the ways to go in this shop. No spray guns allowed. Or needed.
 |
| The neck is finished with Tru Oil, a famous brand of gunstock oil. It'll give a nice, satin, woody feel to the neck. A thin layer is wiped on, the excess wiped off after a while, using a paper towel. I let each layer dry 24 hours after which I buff lightly with 0000 steel wool before adding the next coat. A week or so'll build up the thickness I need. |
 |
| I prefer my necks with no tinting. The beauty of the wood itself something I don't want to shade with colors. Age and natural UV rays will darken the wood gradually. |
 |
| The first step of french polishing is to seal the rosette, binding and purfling, so that no purple color from rosewood is traveling to contaminate the koa binding, white purfling strip or the spruce top. This is done a few times, using just a folded piece of cloth. Then the whole guitar is spit coated with shellac using cloth, before the actual polishing/building up action takes place. I LOVE the tone and lustre of the koa binding against rosewood! |
 |
| This time I'm trying Ubeaut Hard Shellac that is rumored to be harder and more durable than the ordinary shellac. We'll see that later. The rosewood is pore filled with Timbermate filler from stewmac. It seems easier than the pumicing or epoxy methods that I've tried before. |
Tilaa:
Blogitekstit (Atom)